前言
在配置hexo博客的时候,发布需要使用github的无密码认证方式。在此简单的总结一下。
准备工作如下:
- hexo blog搭建完毕
- 本地有git bash
- 已配置好git config信息
检查SSH keys
首先检查本地是否有sshkey,到对应的文件夹下(一般位于users/.ssh/),或者打开git bash:1
$ ls -al ~/.ssh
# Lists the files in your .ssh directory, if they exist
检查目录是否已经存在SSH公钥,默认的key的文件名如下:
id_dsa.pub、id_ecdsa.pub、id_ed25519.pub、id_rsa.pub
如果检查到有链接到github的公钥和私钥(如:id_rsa和id_rsa.pub),跳到 添加key到ssh-agent
生成新的ssh key
打开git bash,执行以下命令。
1
$ ssh-keygen -t rsa -b 4096 -C "your_email@example.com"
# Creates a new ssh key, using the provided email as a label
# Generating public/private rsa key pair.
保持默认设置回车继续。此时的命令行如下:
1
Enter file in which to save the key (/Users/you/.ssh/id_rsa): [Press enter]
输入密码
1
Enter passphrase (empty for no passphrase): [Type a passphrase]
# Enter same passphrase again: [Type passphrase again]
控制回显key的信息
1
Your identification has been saved in /Users/you/.ssh/id_rsa.
# Your public key has been saved in /Users/you/.ssh/id_rsa.pub.
# The key fingerprint is:
# 01:0f:f4:3b:ca:85:d6:17:a1:7d:f0:68:9d:f0:a2:db your_email@example.com
添加key到ssh-agent
这一步我们用已生成的ssh key来config我们的ssh-agent。
- 确保ssh-agent以启动
如果是Git Bash使用如下命令1
# start the ssh-agent in the background
ssh-agent -s
# Agent pid 59566
如果是其他的终端类型,比如:msysgit,则如下:1
# start the ssh-agent in the background
eval $(ssh-agent -s)
# Agent pid 59566
- 添加key到ssh-agent
1
$ ssh-add ~/.ssh/id_rsa
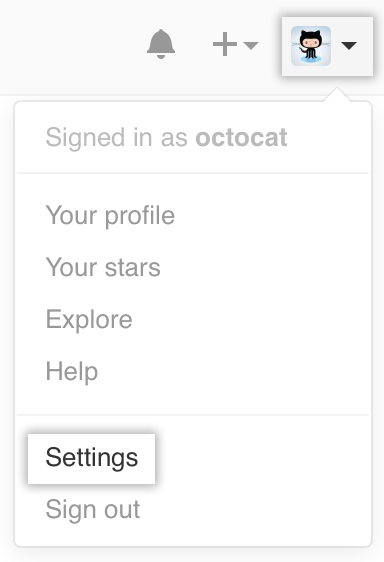
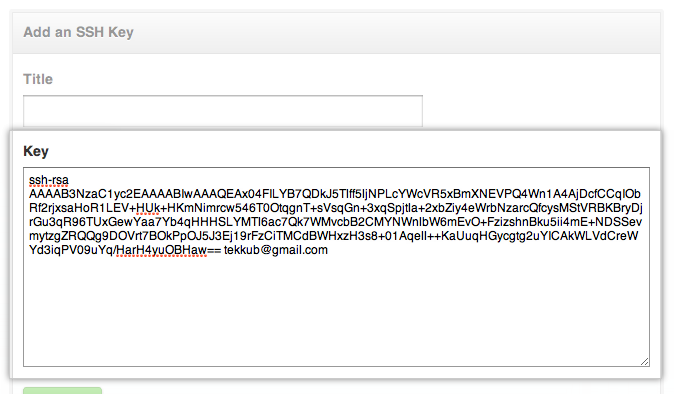
添加SSH key到自己的账户
复制公钥到剪切板。1
$ clip < ~/.ssh/id_rsa.pub
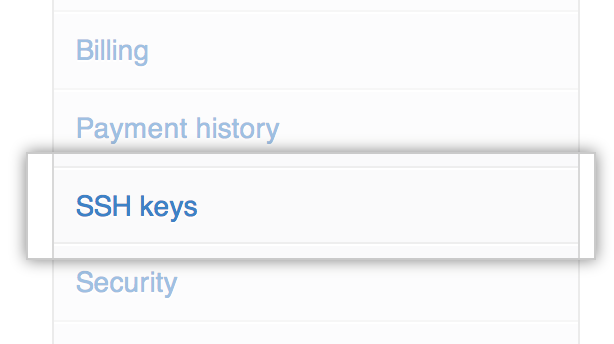
打开github个人的ssh key管理页面:
相关链接
github ssh keys:https://help.github.com/articles/generating-ssh-keys/